Upcycled Backpack from Old Jeans

IMG_6905

Remember when I made my little sister an adorable backpack in this post?  I may or may not have been extremely jealous afterwards.  I may or may not have tried to see if I could try and wear her backpack too.  And that may or may not have completely failed.

And then, one day, it struck me.  I would make a backpack out of a pair old jeans!  Not mine, because I don’t have any old jeans.  And I searched on the internet and out popped many very sophisticated backpacks… that would all take forever.  And I did not want to spend forever on this.

Until I discovered…

this video.  (The second part is here.)  The perfect little bag!

But… I didn’t want a purse.  (Or hold-all, as she called it, because it really does hold all.)  I needed a backpack!  So, pulling out my knowledge of making drawstring bags, I got to work.  Forgetting taking pictures along the way.  Sorry!

First, I did all of the cutting shown in the first video.  Most of the same sewing, too, until I got to sewing up the corners of the bag.

IMG_6884

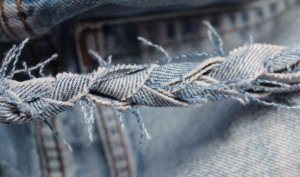
At this point, I cut three strips of denim from the remainder of the pant leg to create a braid that would become the straps.  Both ends were sewn up.

IMG_6891

To attach the strap to the end of the bag, I pulled one strap inside the bag (which was inside-out at this point) so that one end was at the corner of the bag.  I then sewed that corner up.

IMG_6887

This is what it looks like from the outside.

IMG_6899

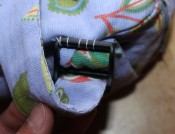
Two slits were cut in the waistband so that I could thread elastic into it.

IMG_6882

I finished it off with a simple knot, which I cannot untie no matter what.  Hopefully that won’t become a problem later.

IMG_6900

The top end of the strap was sewn in with a few stitches on the inside of the waistband.  It will probably fall out at some point, but until then, it’ll do.

IMG_6895

The pockets had to be repaired a bit, because they were developing holes.  Not the most beautiful pocket anymore, but no one will see it anyway.

IMG_6880

I threaded an old scarf through the belt loops to make it look nicer (and less like someone’s butt), also to tie up the top more securely.

Now I present you with the backpack from all angles!

The front!  (So what if it's suspended from a window cord?  No judging!)
The front! (So what if it’s suspended from a window cord? No judging!)
The back!  (Same window cord.)
The back! (Same window cord.)
The top!
The top!
The front pocket!
The front pocket! (One of them, at least)
The back pocket! (one of them)
The front laid out...
The front laid out…
And the back laid out.
The front inside-out...
The front inside-out…
And the back inside-out.

Opinions?  Aren’t you just rushing home and digging out your old jeans to make this?  (Or, if you don’t have old jeans, “borrowing” your sister’s.)  No fancy materials needed, and it takes only a few stitches!  It only took me one day, and this is me we’re talking about!

And, just in case you forgot what it looks like, this is the fab backpack.

IMG_6905

Backpack is fab ~ Fab is backpack

(fab is not my comfy hoodie)

Have a very very nice Sunday, and don’t forget about Martin Luther King while you’re off on vacation!

Speaking of which, where are you all going on vacation?

Is it fun?

Can you invite me?

Actually, now I’m just getting creepy.

Signing off,

-Coco

Linked to the Crafts a la Mode Linky Party and the Clever Chicks Blog Hop #122.

Preschooler’s Backpack

IMG_6846

First of all, this isn’t my design.  And it isn’t a tutorial.  I promise I am not going to do any stealing in this post.

Today I bring you a very long post, with pictures, on me obnoxiously bragging.  I’ve just finished making a little backpack for my 3 year old little sister, who has just begun attending preschool.  It has taken my 4 whole months to get this little thing finished, and I have to say I am quite proud of the results.  Isn’t it cute?  I know it is.  But that credit cannot go to me, it has to go to Beckie at www.infarrantlycreative.net .  The original tutorial is here, and you better go visit it, because it is just the cutest and most genius little backpack ever!

Now.  About the taking four months to make this thing.  I have an excuse!  I don’t have a sewing machine.  Yes, I can already imagine many of you emitting gasps of horror, but I do not own a sewing machine.  So I had to do all of this by hand, while juggling schoolwork, two instruments, preparing for a craft fair, and holiday gift-making at the same time.

Another huge disadvantage of not having a sewing machine is that all of my stitches turn out large, ragged, and generally not very strong.  Even though this backpack hasn’t even been in use yet, I’ve had to make two repairs where stitches have already failed.  However, it has already withstood 24 hours of my sister, so it should be okay.

Even before she started preschool, I was thinking about making my sister a backpack, because her existing one was, in my opinion, very ugly and not very useful.  I searched up several backpacks, and narrowed it down to either this cute circle backpack, or the one I ended up making here.

We took my sister to Jo-Ann, where we helped her pick out two different fabrics.  She had specifically told us that she wanted a purple backpack, so we chose a solid purple canvas for the lining, and my sister picked out a light purple leaf pattern for the exterior.  I actually had my eye on a different pattern, but she insisted on this one.  We also picked up some green bias tape and leaf buttons.

The going was pretty slow.  I would finish a large chunk of the backpack in an hour, then forget about the whole thing for a month.  Periodically, my sister would urge me to get going on her backpack again.

However, I finally did finish, and my sister is now very happy with her newest accessory!

I did make some edits from the original tutorial.

IMG_6834

Instead of using four different sections of straps and a D-ring, I just used two full-length straps and attached a typical backpack’s buckle on each end.  That buckle had to be attached rather messily with long stitches.

IMG_6850

The buckle actually just comes from another old, discarded backpack.

IMG_6835

On the top, the straps were just sewn in, along with the handle.

IMG_6838 IMG_6844

Instead of a magnetic snap, I used just a little loop and a leaf button.  However, I forgot to attach the loop until after I had already sewed the flap, so I had to sew it on the outside, as shown in the picture on the right.

IMG_6843When sewing the flap onto the main pouch, I was afraid the hem of the flap would wear down over time, so I sewed a strip of bias tape over it.  I think it looks nice anyway.

front view
front view
side pouch
side pouch
side pouch with water bottle
opening
opening
top
top
back
back

The difficulty level of this backpack was not too high, so I would even suggest it to someone who has never completed a big sewing project before.  And it definitely doesn’t hurt that the backpack itself is adorable!

IMG_6847

I really recommend this tutorial.  Please visit the original so I don’t feel guilty of stealing!

-Coco

Linked to the Clever Chicks Blog Hop #120.